During the first week, I focused on familiarizing myself with the tools I would be using for my projects. The first week was so incredibly overwhelming since I was unfamiliar with the methods, technology, and tools used in the class. A majority of class time was spent on lectures and demonstrations, which all flew over my head. Because of this, I spent several hours each day watching videos and practicing on my own to get through the initial learning curve. I am satisfied though because I learned a lot about what I would need to know in the future. Learning now gets rid of the future pains I would have dealt with.
Project Management
        Git and GitLabs was used for version control and project management.
        Initally, the process of pushing and pulling between my local repo and remote repo was very
        confusing, and I could not make it work for a couple daysHowever, after watching videos, practicing the configuration, and
        learning the Git commands, I was able to understand the process needed to use Git effectively and have had no problems
        working and managing on my project anywhere ever since. So, I made some very easy to follow notes on the basics of Git
        for my future self.


            Configuration

            git config --global user.name "Your Name"
            git config --global user.email "youremail@example.com"
            git config --global init.defaultBranch main

            Creating Project Through Initializing Local Repository First

            Open terminal and cd to the directory you want to create your project in.

                Initialize local repository: git init

            Should see .git in directory now.

                git status to see newly added files to working directory

                git add . to add files to staging area

                git commit -m "Initial commit" to commit files to local repository

                git branch -M main to set default branch to main

            Open Git hosting serving (GitLab, GitHub, etc.) and create new repository (same name as local repo for consistency).

                git remote add origin [paste link] to add remote repository

                git push -u origin main to push local repository to remote repository

            Open Git hosting service and refresh page to see files pushed to remote repository.

            Open project folder and start working on project (use ctrl + s to save changes).

                git status to see changes made to working directory

                git add . to add all changes to staging area
                or
                git add "filename" to add specific file to staging area
                can use
                git diff to see changes made to files before adding to staging area
                or
                git restore --staged "filename" to unstage a specific file

                git commit -m "commit message" to commit changes to local repository

                git push -u origin main use only for the first time pushing changes on this branch
                git push to push changes to remote repository after the first time
                *every new branch will need the -u origin main command the first time to push changes


            Working on remote repository on local repository

            For the first time working on a remote repository on your local machine:
            Open terminal and cd to the directory you want to clone your project in.

                git clone [paste link] to clone remote repository to local repository

            You can now work on the project and use the same commands as above to push changes to remote repository.

            When working on a project that has already been cloned to your local machine:
            Open terminal and cd to the directory of your project.

                git pull to pull changes from remote repository to local repository


         Note: Creating a project by first making a remote repository first is pretty easy and can be done
                following instruction from GitHub.
Very Simple Web Development
I learned to setup a local development environment using Visual Studio Code and Git which made it really easy to code and see changes in real-time. I used HTML to a build a very simple webpage for my documentation. I want to start leaning CSS and JavaScript next to make my website more interactive and engaging.
Parametric Design
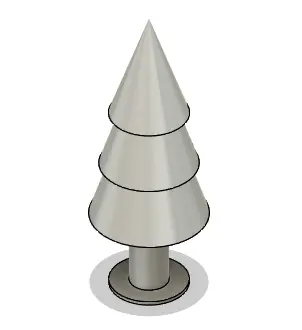
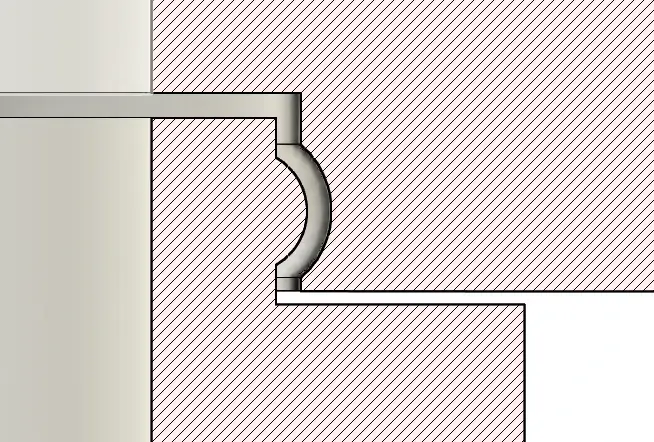
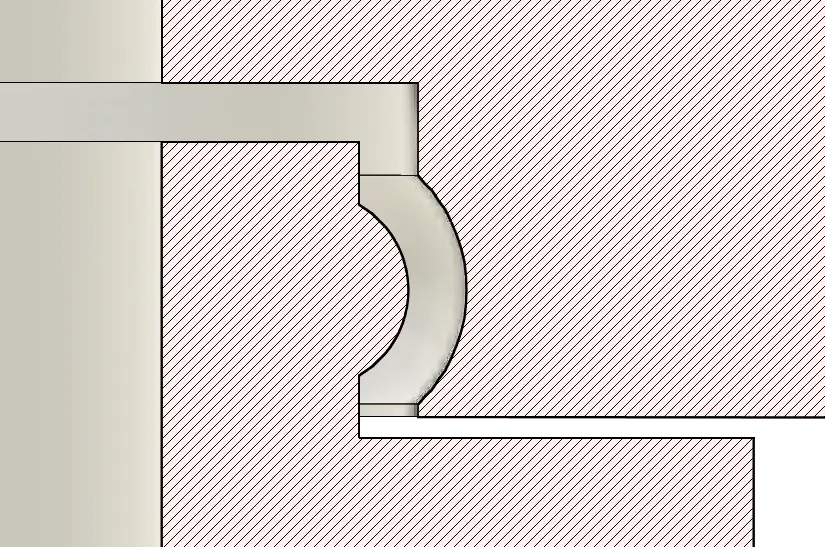
I learned the basics of parametric design using Fusion 360. I used parameters to create a snap fit part that can be easily modified by changing the parameters. I created a toy tree that uses an annular snap joint. The parameter allows me to augment how snug the joint is. Which allows me to easily test the optimal fit for my snap fit part.
Toy Tree